
Oauth2proxy is a super simple application that allows you to put an oauth based login page in front of an application that does not otherwise support OIDC.
They describe themselves as
A reverse proxy and static file server that provides authentication using Providers (Google, GitHub, and others) to validate accounts by email, domain or group.
This post goes over setting up oauth2proxy in a somewhat kubernetes native way, using things like cert-manager and external-secrets
Our use case
We’ve got an application like Tinyfeed, and you’ve subscribed to some naughty feeds (for example: https://www.reddit.com/r/homelabsales.rss)
which is exposed to your internal network that everyone can find if they navigate to your dashboard. You don’t want your kids and wife to access it, but the app does not support native OIDC
How oauth2 proxy works
Enter oauth2-proxy! It works in 2 ways
- Stand-alone reverse proxy (What this post will implement)
- Authentication middleware (out of scope for this post)
Below demonstrates this

Images courtesy of the oauth2-proxy folk
When you navigate to an application protected by oauth2-proxy, you then get a log in page like the below, which upon logging in to takes you to your OIDC provider of choice.

Once Authenticated and Authorized, you get access to the application and oauth2-proxy just acts as a reverse web-proxy
Requirements
Due to how oauth2-proxy is intended to work, you would be using this to expose an internal service via a type: LoadBalancer
In order to get this working in a somewhat kubernetes native way, we will need;
- Working Kubernetes cluster (or as close to working as possible!)
- cert-manager
- A subdomain of your main domain is useful, but not required!
- external-dns (Optional if you manage DNS your self)
- pre-existing oidc provider supported by oauth2-proxy
- pre-existing oidc setup for oauth2-proxy
Installing Cert Manager
I use flux to manage my cluster, so the below will be FLux related manifests
Create a file called cert-manager.yaml
touch cert-manager.yaml
In that file put the below:
apiVersion: v1
kind: Namespace
metadata:
  name: cert-manager
---
apiVersion: source.toolkit.fluxcd.io/v1
kind: HelmRepository
metadata:
  name: cert-manager
  namespace: flux-system
spec:
  interval: 1m0s
  url: https://charts.jetstack.io
---
apiVersion: helm.toolkit.fluxcd.io/v2
kind: HelmRelease
metadata:
  name: cert-manager
  namespace: flux-system
spec:
  chart:
    spec:
      chart: cert-manager
      reconcileStrategy: ChartVersion
      sourceRef:
        kind: HelmRepository
        name: cert-manager
        namespace: flux-system
      version: 1.19.1
  interval: 1m0s
  releaseName: cert-manager
  targetNamespace: cert-manager
  values:
    enableCertificateOwnerRef: true
    dns01RecursiveNameserversOnly: true
    dns01RecursiveNameservers: "9.9.9.9:53,149.112.112.112:53"
    extraArgs: # Required incase we create a `*.rg.breanet.co.uk` cert as this will point to the router and it will return with GFYS
      - --enable-certificate-owner-ref=true
      - --dns01-recursive-nameservers-only=true
      - --dns01-recursive-nameservers=9.9.9.9:53,149.112.112.112:53
    crds:
      enabled: true
Cloudflare setup for DNS Challenges
I have designed my clusters in such a way that services are named based on their location. For example the service of lubelogger will be lubelogger.rg.breadnet.co.uk
This means that I will be using the subdomain of rg.breadnet.co.uk for all my services. In order to get a valid SSL certificate from cert-manager we need to
give it the ability to do DNS challenges.
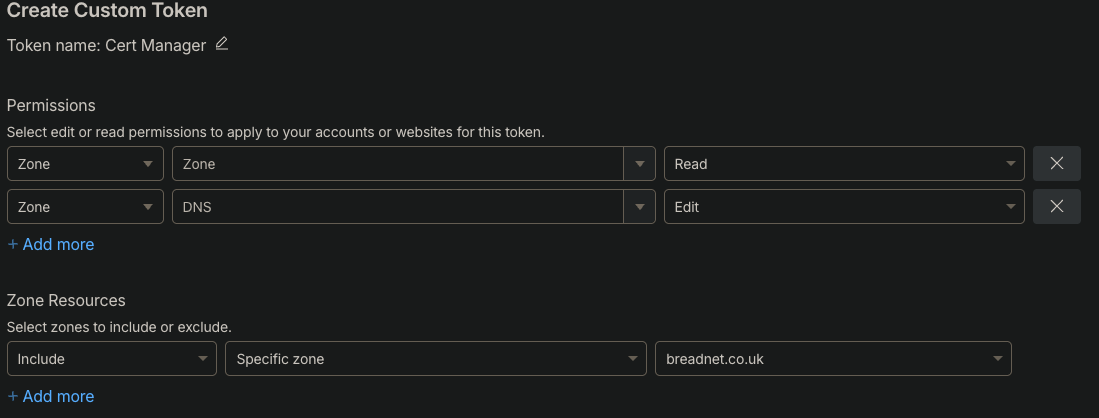
Navigate to your Cloudflare dashboard > Settings > Account API tokens
Create an API token and give it:
Zone Zone ReadZone DNS Edit
Select Zone Resources and set it to Include Specific Zone and set the zone you will be using.
In this example I am creating records under breadnet.co.uk zone
You will then get the Secret token. Copy this and place it in your Clipboard for later
Cert manager ClusterIssuer
Next we will need to create a cluster issuer within the cluster that is able to make certificates for the domain we’ve authorized cert-manager to
do.
As we’re using DNS challenges, we will need to tell cert-manager how to authenticate with Cloudflare
Create a secret for the Cloudflare token we created earlier
kubectl create secret generic cloudflare-api-token-secret \
  --from-literal=api-token="paste the token here"
Next step is to create a ClusterIssuer which can be used across the cluster to generate
apiVersion: cert-manager.io/v1
kind: ClusterIssuer
metadata:
  name: cloudflare
spec:
  acme:
    server: https://acme-v02.api.letsencrypt.org/directory
    email: <your email here>
    privateKeySecretRef:
      name: cloudflare-account-key
    solvers:
      - dns01:
          cloudflare:
            apiTokenSecretRef:
              name: cloudflare-api-token-secret
              key: api-token
Create the Certificate
In the namespace of your chosen app, create a certificate using the ClusterIssuer
apiVersion: cert-manager.io/v1
kind: Certificate
metadata:
  name: tinyfeed
spec:
  secretName: tinyfeed-cert
  privateKey:
    algorithm: RSA
    encoding: PKCS1
    size: 2048
  duration: 2160h
  renewBefore: 360h
  isCA: false
  usages:
    - server auth
    - client auth
  dnsNames:
    - tinyfeed.rg.breadnet.co.uk
  issuerRef:
    name: cloudflare
    kind: ClusterIssuer
    group: cert-manager.io
After around 20 minutes, check the cert
$ kubectl get certificate
NAME      READY       SECRET       AGE
tinyfeed   True    tinyfeed-cert   63d
Deploy Oauth2-proxy
oauth2-proxy is made up of a few parts;
- Service that users will hit (
LoadBalancer) - oauth2-proxy
- Config map with the config
- Service for the app (
ClusterIp)
First we will setup the config map for oauth2-proxy
apiVersion: v1
kind: ConfigMap
metadata:
  name: oauth2proxy
data:
  # Change the below to map to your OIDC provider
  OAUTH2_PROXY_CUSTOM_SIGN_IN_LOGO: ""
  OAUTH2_PROXY_CLIENT_ID: ""
  OAUTH2_PROXY_CLIENT_SECRET: ""
  OAUTH2_PROXY_OIDC_ISSUER_URL: ""
  # Below needs to point to the internal service of your app
  # I've called mine `tinyfeed-internal` and it's on port 80
  OAUTH2_PROXY_UPSTREAMS: "http://tinyfeed-internal:80"
  OAUTH2_PROXY_PROVIDER_DISPLAY_NAME: "breadNET Auth"
  # Can leave the below as is
  OAUTH2_PROXY_PROVIDER: "oidc"
  OAUTH2_PROXY_SCOPE: "openid email profile groups"
  OAUTH2_PROXY_REVERSE_PROXY: "true"
  OAUTH2_PROXY_EMAIL_DOMAINS: "*"
  OAUTH2_PROXY_INSECURE_OIDC_ALLOW_UNVERIFIED_EMAIL: "true"
  OAUTH2_PROXY_HTTP_ADDRESS: "0.0.0.0:80"
  OAUTH2_PROXY_HTTPS_ADDRESS: "0.0.0.0:443"
  OAUTH2_PROXY_TLS_CERT_FILE: "/etc/certs/tls.crt"
  OAUTH2_PROXY_TLS_KEY_FILE: "/etc/certs/tls.key"
  OAUTH2_PROXY_FOOTER: "-"
  OAUTH2_PROXY_COOKIE_SECRET: "xHNkIYryM-gkEa21EPcV1muYkPW7giohfkd8V98WyWs="
Once this is deployed, we can then configure oauth2-proxy to use this config map as well as certificate to get SSL without a self signed cert!
apiVersion: apps/v1
kind: Deployment
metadata:
  name: oauth2proxy
  labels:
    app: oauth2proxy
  annotations:
    reloader.stakater.com/auto: "true"
spec:
  replicas: 1
  selector:
    matchLabels:
      app: oauth2proxy
  template:
    metadata:
      name: oauth2proxy
      labels:
        app: oauth2proxy
    spec:
      containers:
        - name: oauth2proxy
          image: quay.io/oauth2-proxy/oauth2-proxy:v7.13.0
          imagePullPolicy: IfNotPresent
          envFrom:
            - configMapRef:
                name: oauth2proxy
          ports:
            - containerPort: 80
              protocol: TCP
              name: http
            - containerPort: 443
              protocol: TCP
              name: https
          volumeMounts:
            - mountPath: "/etc/certs/tls.crt"
              subPath: "tls.crt"
              name: certificate
            - mountPath: "/etc/certs/tls.key"
              subPath: "tls.key"
              name: certificate
      restartPolicy: Always
      volumes:
        - name: certificate
          secret:
            secretName: tinyfeed-cert
Followed by a service that exposes Tinyfeed, via oauth2-proxy
apiVersion: v1
kind: Service
metadata:
  name: tinyfeed-external
  annotations:
    external-dns.alpha.kubernetes.io/hostname: tinyfeed.rg.breadnet.co.uk
spec:
  type: LoadBalancer
  selector:
    app: oauth2proxy
  ports:
    - protocol: TCP
      port: 80
      targetPort: 80
      name: http
    - protocol: TCP
      port: 443
      targetPort: 443
      name: https
Once your load balancer has been provisioned (In my case, Metallb) you should be able to navigate to the hostname of your app and be greeted with the login page
Closing notes
If you struggled with anything, please feel free to reach out!