
This is something that took some time to get my head around, but once I managed to (somewhat) figure it out, it’s made exposing my services to the internet a lot easier
After a few years of building up the courage and knowledge to host stuff that my friends and I can use, it’s become apparent that updating a DNS record every time your public IP at home changes, isn’t a great way to host things. This is where Nginx reverse proxy comes in.
I was alerted by a user on reddit that cloudflare have an API you can use if your DNS is managed from them that makes updating dynamic ip’s to domains simle if you decide to host a reverse proxy server at home
Firstly we will need a server somewhere on the internet. I suggest someone like Digital Ocean or Vultr with their cheapest option. Nginx does not require a large amount of resources to run which is nice.
For this scenario, lets image I am hosting this website on my servers at home, and don’t want the whole world to know my home connections IP address. Slap it behind a reverse proxy and problem solved.
In this example I will be using Ubuntu. Any version works, as long as it’s not EOL
We can start by installing Nginx
sudo apt-get install nginx -y
Now once installed, I like to enable it so it starts on a system reboot.
sudo systemctl enable nginx
Sweet, now if you go to the IP address of your server you should be welcomed with a generic welcome/ hello world. (It’s been a while. I cant remember)
If there are issues with Nginx starting, there may be another application running on port 80 or 443. You can check with the below
netstat -plnt | grep 80
netstat -plnt | grep 443
The reverse’y part
Now that we have nginx up and running on our droplet/ vps/ what ever we can start reversing stuff.
Based on where your server is running/ what you intend to use it for, your mileage may vary. I am going to explain 3 types of scenarios I use and why.
The first is a very generic way that you can build on, and the following 3 are how it can be fine tuned
This is the most basic configuration I could think of. You have a server on your network, we will call it edge and on that network you also have a server called app but you don’t want to expose the app server to the tinternet.
You will want to make a new nginx config based off what you want the end URL to look like. For simplicity we will make the domain app.breadnet.co.uk but you will need to make this your domain.
sudo nano /etc/nginx/sites-available/app.domain.tld
In there, paste the following:
server {
      listen 80;
      listen [::]:80;
      server_name <domain>.breadnet.co.uk;
     add_header Strict-Transport-Security "max-age=15552000; includeSubDomains" always;
 access_log /var/log/nginx/<domain>/access.log;
 error_log /var/log/nginx/<domain>/error.log;
       location / {
       proxy_pass <ip/hostname>;
       proxy_next_upstream error  timeout invalid_header http_500 http_502 http_503;
       proxy_set_header Host $host;
       proxy_set_header X-Real-IP $remote_addr;
       proxy_set_header X-Forward-For $proxy_add_x_forwarded_for;
       proxy_set_header X-Forwarded-Proto https;
       proxy_redirect off;
       proxy_read_timeout 5m;
   }
client_max_body_size 10M;
}
You will need to edit servername to your domain, and then under proxy_pass you need to ensure this points to the domain or IP address of app
I find with some services like Cachet and sensative, the web server config on the serving node needs to have it’s web address set as the end result of passing it via nginx.
Now we can enable the page:
sudo ln -s /etc/nginx/sites-available/app.breadnet.co.uk /etc/nginx/sites-enabled/app.breadnet.co.uk
Once done, restart nginx with sudo systemctl restart nginx
You will need to login to you DNS providor and add an A record pointing to the IP address of edge be it on your home network (in that case you will need to open a port) or a public server on digital ocean or vultr.
Enable SSL with Certbot. You should have this installed by now but if not please install it
sudo apt-get update
sudo apt-get install software-properties-common
sudo add-apt-repository universe
sudo add-apt-repository ppa:certbot/certbot
sudo apt-get update
sudo apt-get install certbot python3-certbot-nginx

certbot --nginx -d app.domain.com
Below are more case specific examples you can build off of
1: Opening a port
I run a media server called jellyfin on my local servers at home, and would like to be able to access it out and about with out having to connect to a VPN, as well as allow my friends and family to use it. Due to it’s nature I have opened the firewall at my home to only allow port 8069 from my Digital ocean droplet to connect.
To enable this to work, you will need 3 things.
- Ability to copy, paste and edit
- IP address of your home internet connection
- Domain name like
media.example.comor any subdomain you like
Firstly open the firewall at home to forward connections on the port of needing to the server. Once that is done, I personally add an entry in to /etc/hosts so as my IP address changes, I don’t need to update multiple nginx config files.
sudo nano /etc/hosts
In this file you will want to give the IP a name, I use home.connection so my file looks like:
root@reversinator:~$ cat /etc/hosts
127.0.0.1 localhost
127.0.1.1 reversinator
151.101.192.144 home.connection


# The following lines are desirable for IPv6 capable hosts
::1     ip6-localhost ip6-loopback
fe00::0 ip6-localnet
ff00::0 ip6-mcastprefix
ff02::1 ip6-allnodes
ff02::2 ip6-allrouters
Obviously change out your IP address and name.
Now we need to edit the nginx config. For this I personally prefer to name the file the page it will point to. Just makes auditing quicker
nano /etc/nginx/sites-available/<page.domain.tld>
So here it would be media.example.com but you’re welcome to name your config file jeff
In that file, paste and edit
server {
      listen 80;
      listen [::]:80;
      server_name <sub>.<domain>.<tld>;
     add_header Strict-Transport-Security "max-age=15552000; includeSubDomains" always;
 access_log /var/log/nginx/<domain>/access.log;
 error_log /var/log/nginx/<domain>/error.log;
       location / {
       proxy_pass <ip/hostname>;
       proxy_next_upstream error  timeout invalid_header http_500 http_502 http_503;
       proxy_set_header Host $host;
       proxy_set_header X-Real-IP $remote_addr;
       proxy_set_header X-Forward-For $proxy_add_x_forwarded_for;
       proxy_set_header X-Forwarded-Proto https;
       proxy_redirect off;
       proxy_read_timeout 5m;
   }
client_max_body_size 10M;
}
Here you will need to change <sub>.<domain>.<tld> to the domain that this will refer to. You can also add www..www. to go to that page.
Once that’s done, you will also need to change <ip/hostname> to reflect where the content is hosted, or what you are reverse proxying. Once that is done, you may also want to edit the line which reads access_log to match <domain> to the domain it is on. This just helps to separate logs for easy viewing.
Once done, you will need to symlink the config file to sites-enabled and then restart Nginx.
2: Using Zerotier
I’m not sure how best to describe Zerotier other than as a Virtual lan that spans the internet. You connect to it though an application either on windows or linux.
You will need to create an account and install it on both machines.
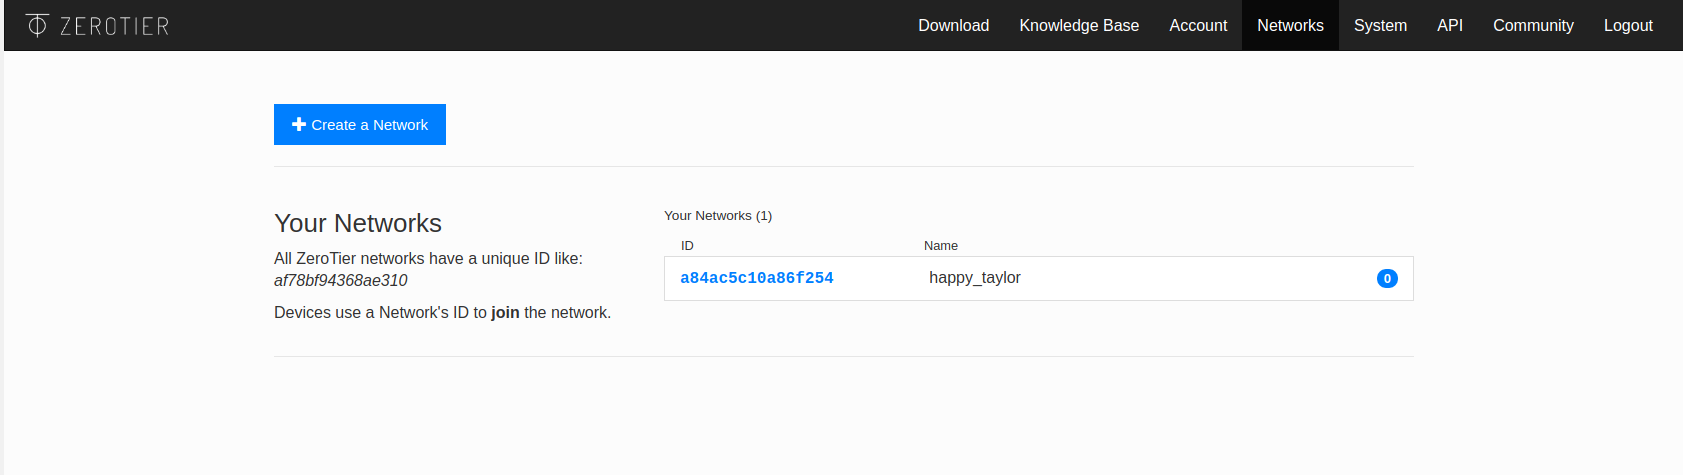
Create an account at my.zerotier.com/
Once your account is creates, click Networks at the top and then + Create a Network
You will see one appear under the Your Networks section
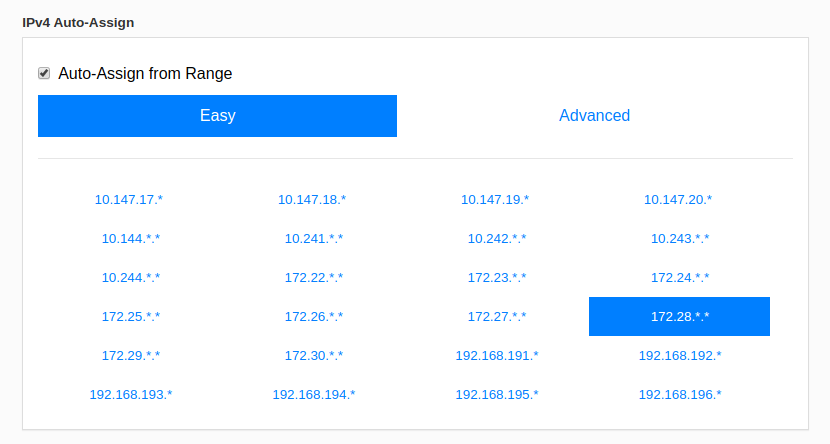
 Click the ID of the network and pick the network range you want. You NEED it to not be used anywhere else!
 Once that is done, you will need to install Zerotier on your content hosting server, as well as the reverse proxy server.
If you trust SSL on linux:
curl -s https://install.zerotier.com | sudo bash
Else, it can be installed here
Now we need to add the server’s to the network!
sudo zerotier-cli join <network ID>
If it returns with 200 it’s happy days. Wait a few minutes and you should see the first server show up in the management page. Add a name to it so you know what’s what.
Repeat for the other server.
make sure you can ping the servers via zerotier. If you cant, wait a few minutes and run pings from both servers to each other. It’s weird but works eventually.
Next we will need to configure NGINX. This is exactly the same as all the other configurations except we will use the zerotier IP address of the content server opposed to another address.
As usual, make this file in the /etc/nginx/sites-available/ folder with the name being the end domain. (see other configs above)
server {
      listen 80;
      listen [::]:80;
      server_name <sub>.<domain>.<tld>;
     add_header Strict-Transport-Security "max-age=15552000; includeSubDomains" always;
 access_log /var/log/nginx/<domain>/access.log;
 error_log /var/log/nginx/<domain>/error.log;
       location / {
       proxy_pass <zerotier address of content server>;
       proxy_next_upstream error  timeout invalid_header http_500 http_502 http_503;
       proxy_set_header Host $host;
       proxy_set_header X-Real-IP $remote_addr;
       proxy_set_header X-Forward-For $proxy_add_x_forwarded_for;
       proxy_set_header X-Forwarded-Proto https;
       proxy_redirect off;
       proxy_read_timeout 5m;
   }
client_max_body_size 10M;
}
Now symlink it
sudo ln -s /etc/nginx/sites-available/config_name /etc/nginx/sites-enabled/config_name
Restart nginx and you should be off to the races
systemctl restart nginx
As with all of these, I suggest SSL!
This is at the top of the page and I suggest you do this!
As will anything on this site, if you have issues or nothing makes sense, drop me an email!
You can hire me via Upwork or emailing me for weekend projects!