Preamble
This post is dedicated to my Partner, who does not understand why I would do this.
I’ve been keeping all my post I’ve received since I was 16. For what reason exactly, I don’t really know. It’s only been useful once when I was verifying my identity with the Government for DBS checks or some financial checks.
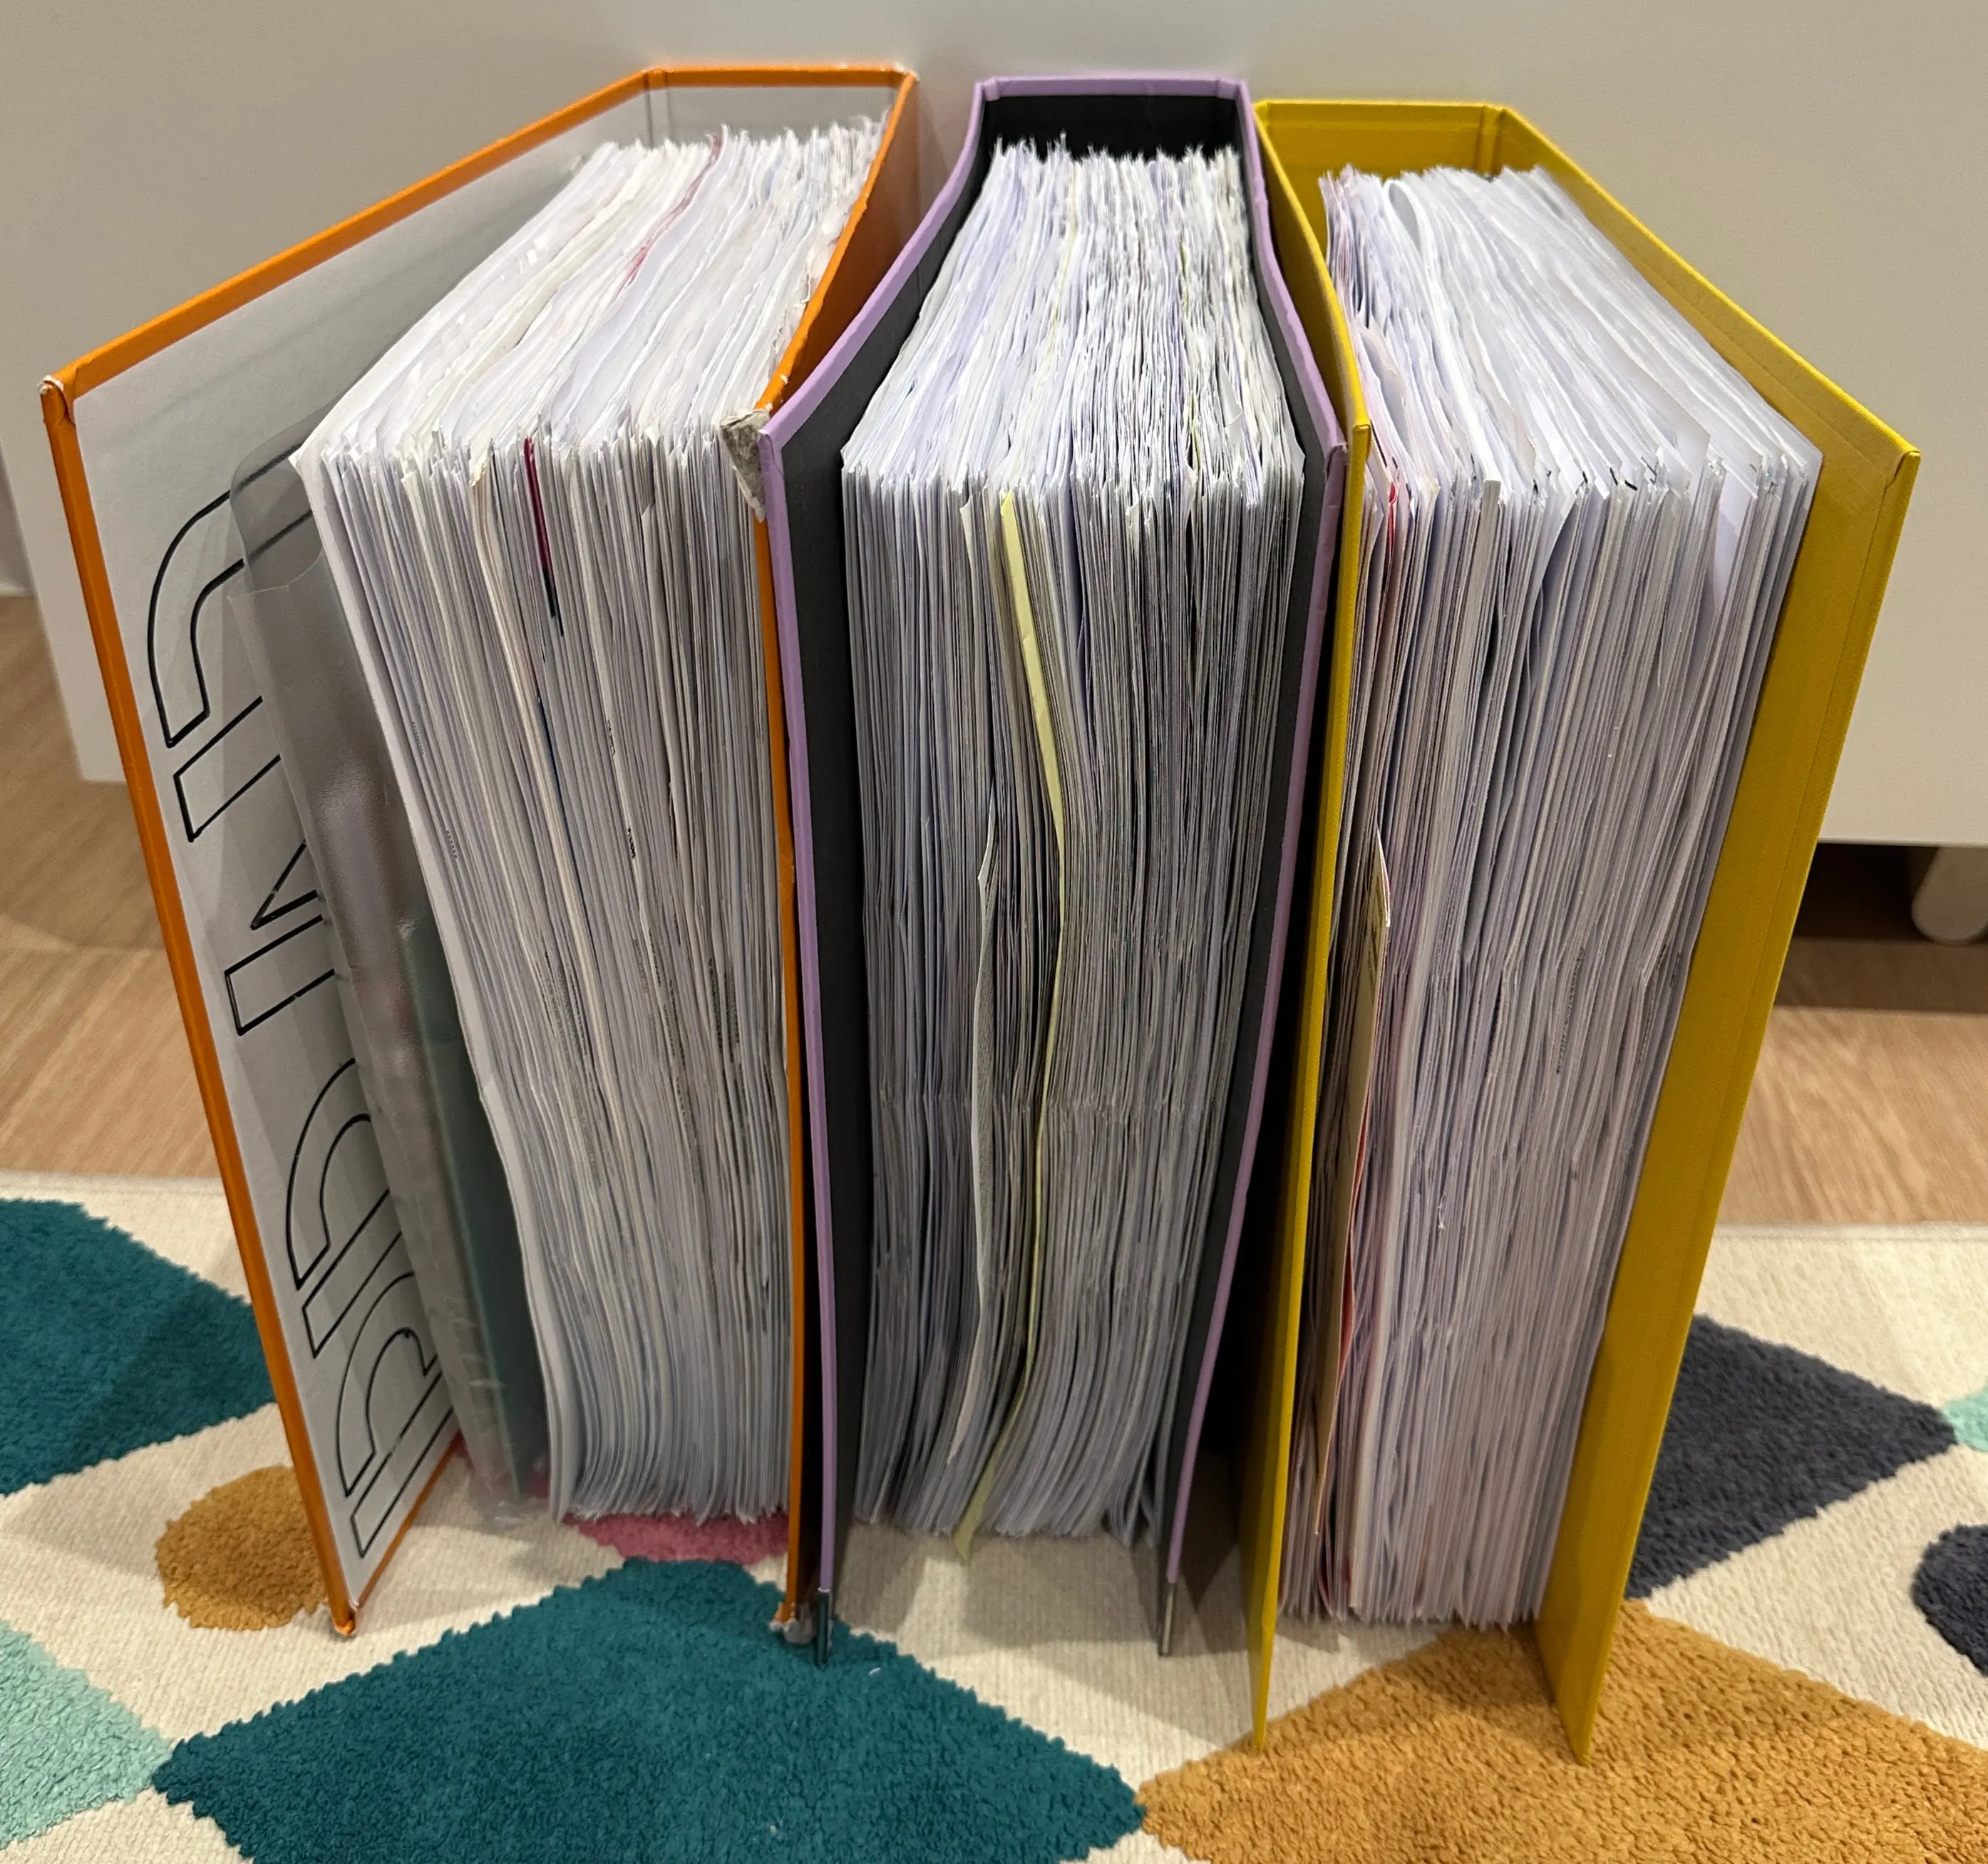
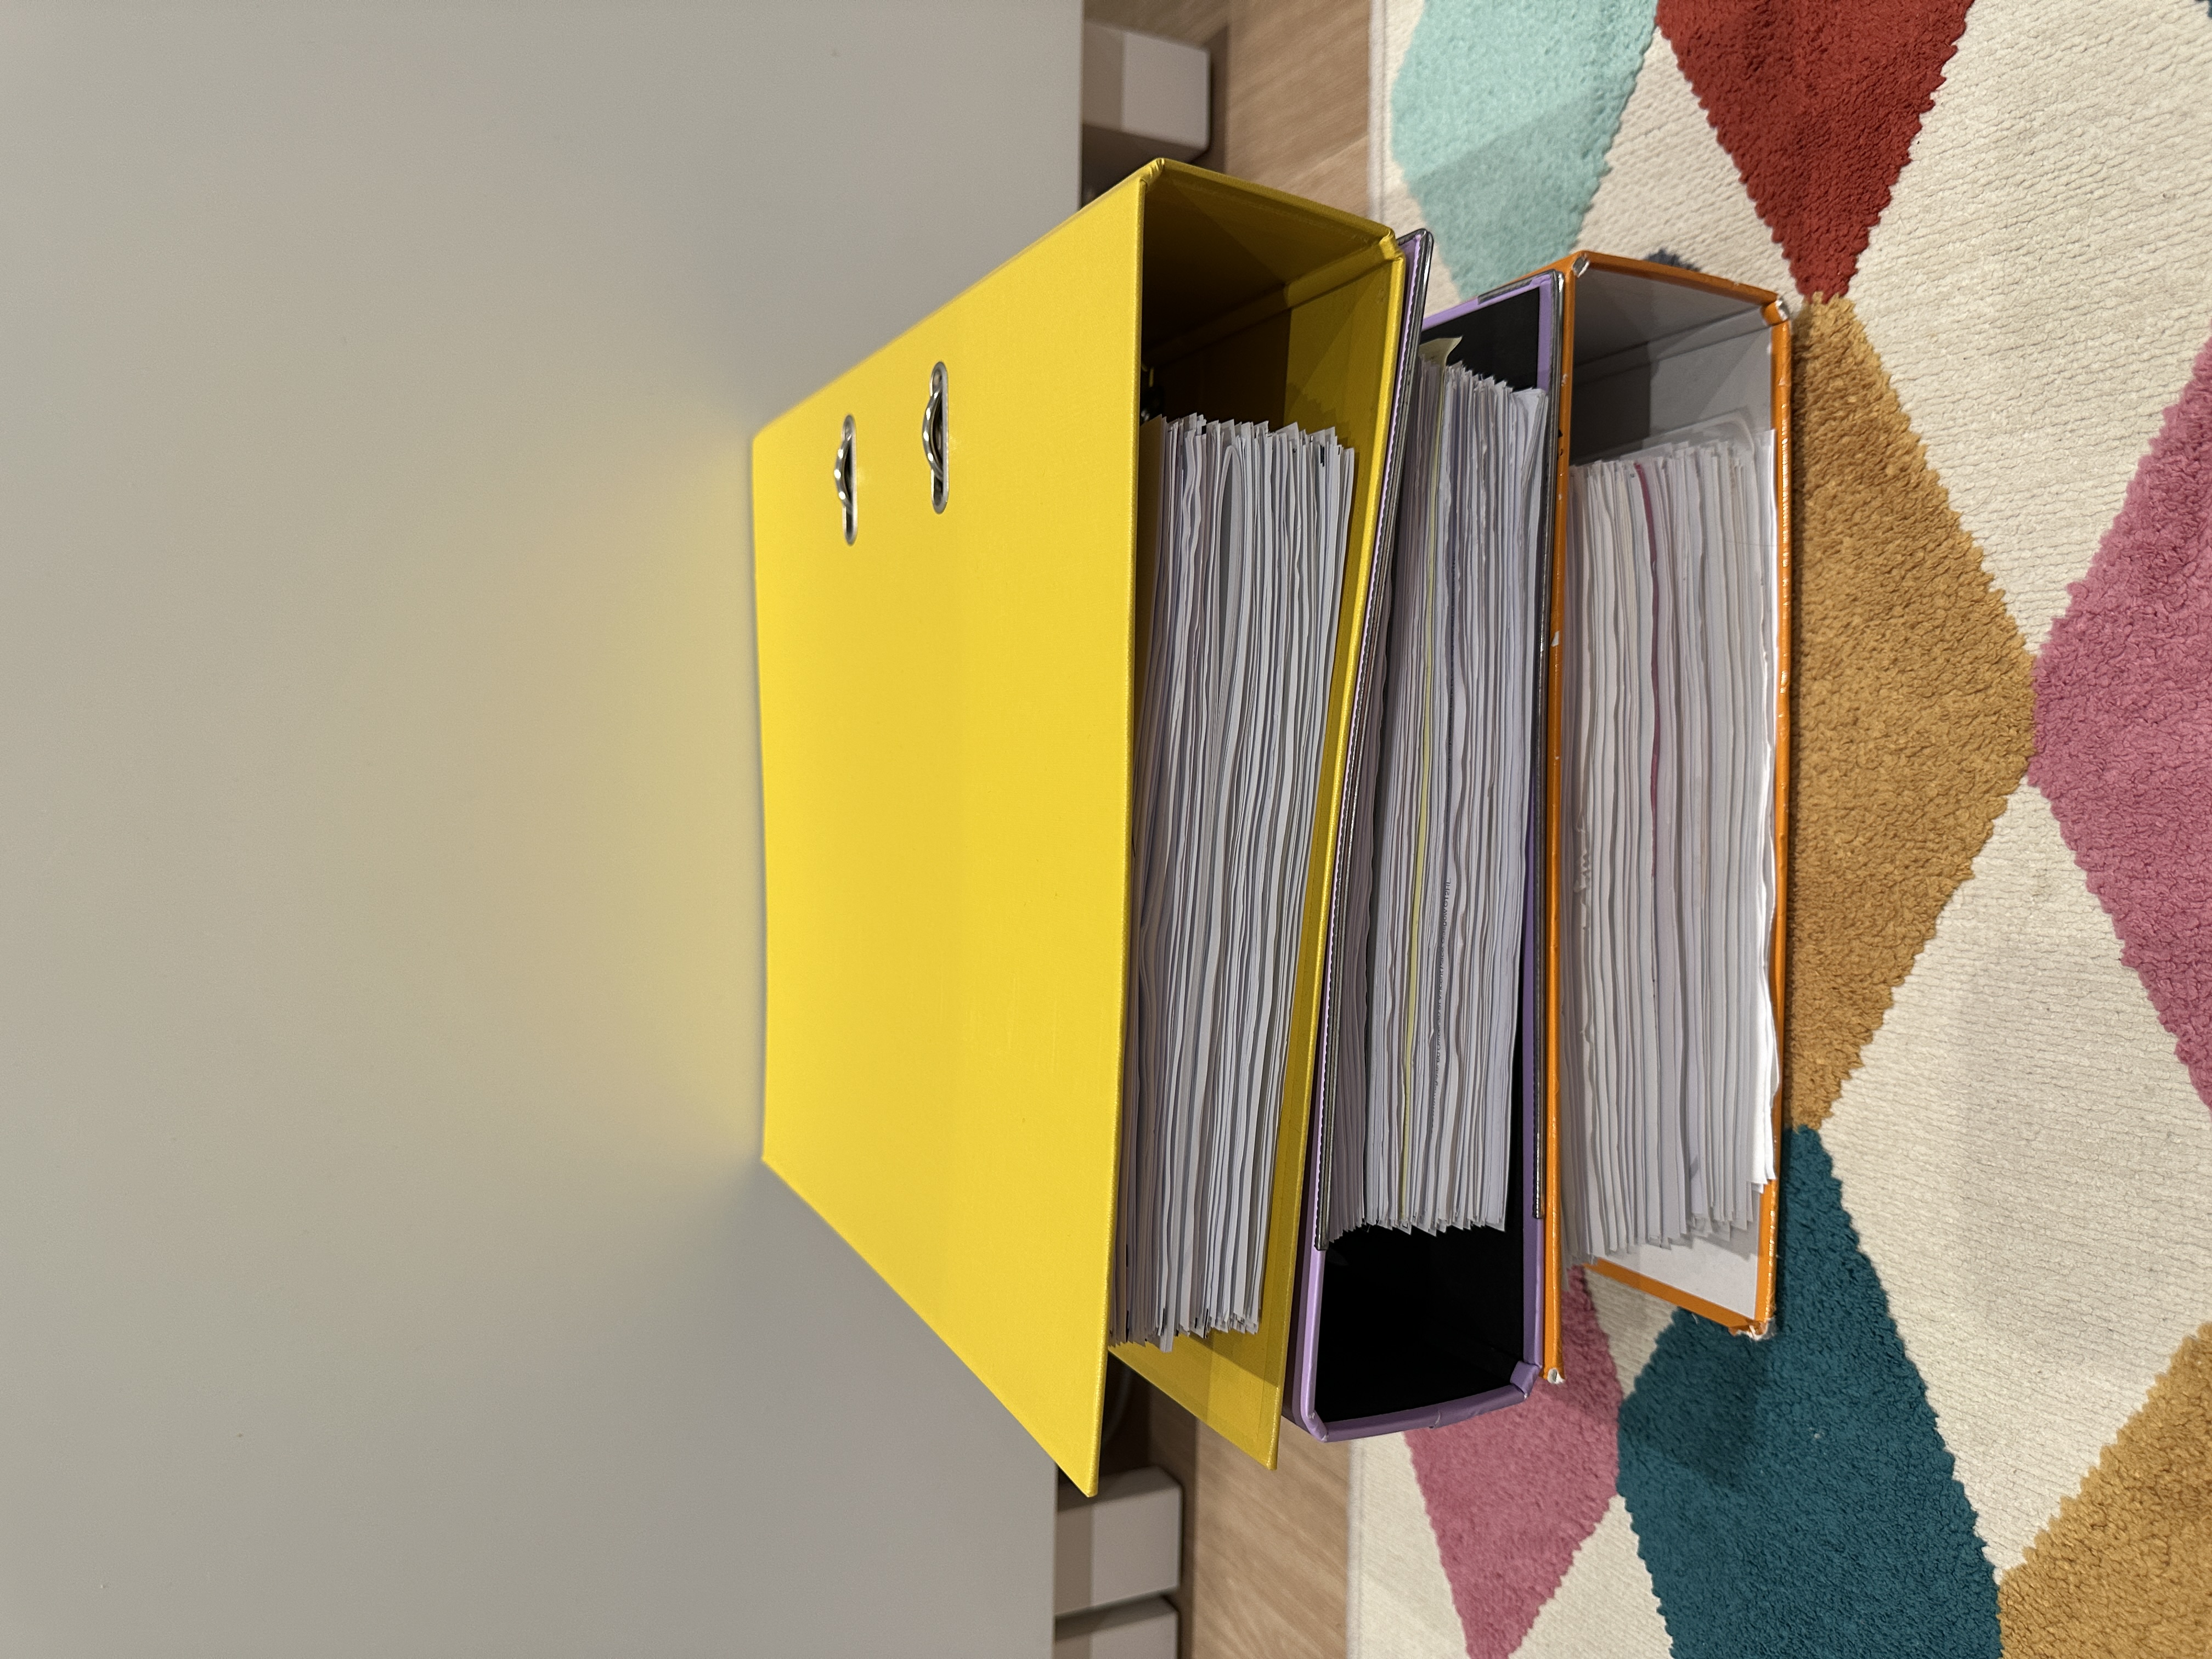
All my post is stored in 3 Lever arch folders.
I’ve always wanted to be able to search these records for things like Financial transactions, interesting things, as well as being able to produce an evidence pack should I be hauled to court for parking tickets
This blog post is maybe 5 years of waiting for the right deal to come up on Ebay, building knowledge on Kubernetes and everything else. Enjoy!
This post will not go over setting up Paperless-ngx as that’s documented in depth in other places of the internet. This post will mainly go over connecting SFTPGo to a Scanner and paperless.
The setup
At it’s simplest, the setup consists of:
- Brother ADS-2700W scanner
- SFTPGo proving FTP service
- Paperless-ngx
- Synology nas
Files flow like
Scanner -> SFTPGo -> Consume folder -> Paperless -> Ingest, ORC and Indexing
Picking your scanner
Selecting a scanner was by far the hardest part. I’ve actually been around 5 years worth of looking on the internet, reading Reddit threads and YouTube.
When deciding on what scanner to get, you should think about the below
- Automatic feed or manual
- Double side or Single side (This references to scanning both sides of the page at one time)
- Networked or Scan to PC
ADF or Manual
When it comes to scanning the documents, you will really want to have something called an ADF Scanner. This stands for Automatic Document Feeder and does pretty much exactly what you expect it to do. It pulls in the next document to scan it.
The benefit of this is you’re able to dump an entire document in (think a multipage bank statement) and click scan then
it pulls the documents through.
For some reason this video does not work, I am not sure why. At some point I will fix it
Duplex Scanning (Double-sided or Single sided scanner)
This refers to when the document is being scanned, weather it scans both the front and back page.
If you’re starting fresh, and budget is quite the concern, I suggest you go for a single paged scanner.
However, if you’re scanning bulk documents in like I am, you will want doublesided scanners.
Network or Scan to PC/USB
Scanning to network usually means one of a few things
- SMB
- FTP/SFTP
- WebDAV
Where as scanning to a Computer/USB means the scanner is directly plugged in to the PDF files are copied to the computer’s file system, or a USB plugged in to the back of the scanner.
Both really work, if you’re scanning to USB stick this just means you’ve got to upload the PDF’s to Paperless-ngx
What scanner options there are
From my research, the contenders I suggest are, in order of what I considered
- Brother ADS-2700W
- Fujitsu fi-8170
- Epson WorkForce ES-580W
- Scansnap ix1600
- Canon Formula R40
Below is the table I made around the scanner options I came up with.
| Feature | Brother ADS-2700W Wireless High-Speed Document Scanner | Fujitsu fi-8170 Scanner Silver | Epson WorkForce ES-580W scanner | Fujitsu Scansnap ix1600 ADF Scanner | Canon Formula R40 Scanner Black |
|---|---|---|---|---|---|
| Duplex ADF | Yes | Yes | Yes | Yes | Yes |
| Single-pass duplex | Yes | Yes | Yes | Yes | Yes |
| Wi-Fi | Yes | Optional / limited | Yes | Yes | No |
| Ethernet | Yes | USB-focused enterprise | No | No | No |
| Scan to FTP | Yes | Yes | Yes | Via software workflows | Limited |
| Scan to email | Yes | Yes | Yes | Yes | Via software |
| Touchscreen | Small | Small/basic | Large touchscreen | Large touchscreen | Minimal |
| ADF capacity | 50 sheets | 100 sheets | 100 sheets | 50 sheets | 60 sheets |
My requirements of FTP and Ethernet immediately removed Fujitsu fi-8170 and Fujitsu Scansnap ix1600 ADF Scanner
as I do not want to be locked in to software. It should ideally be setup and forget.
Below details some of the resources I used on selecting a scanner
- Smart Home Explorer best document scanners of 2026
- Best scanner to use with Paperless?
- Someone suggested the ADS-2700W
My scanner, the Brother ADS-2700W
I present to you, my scanner!
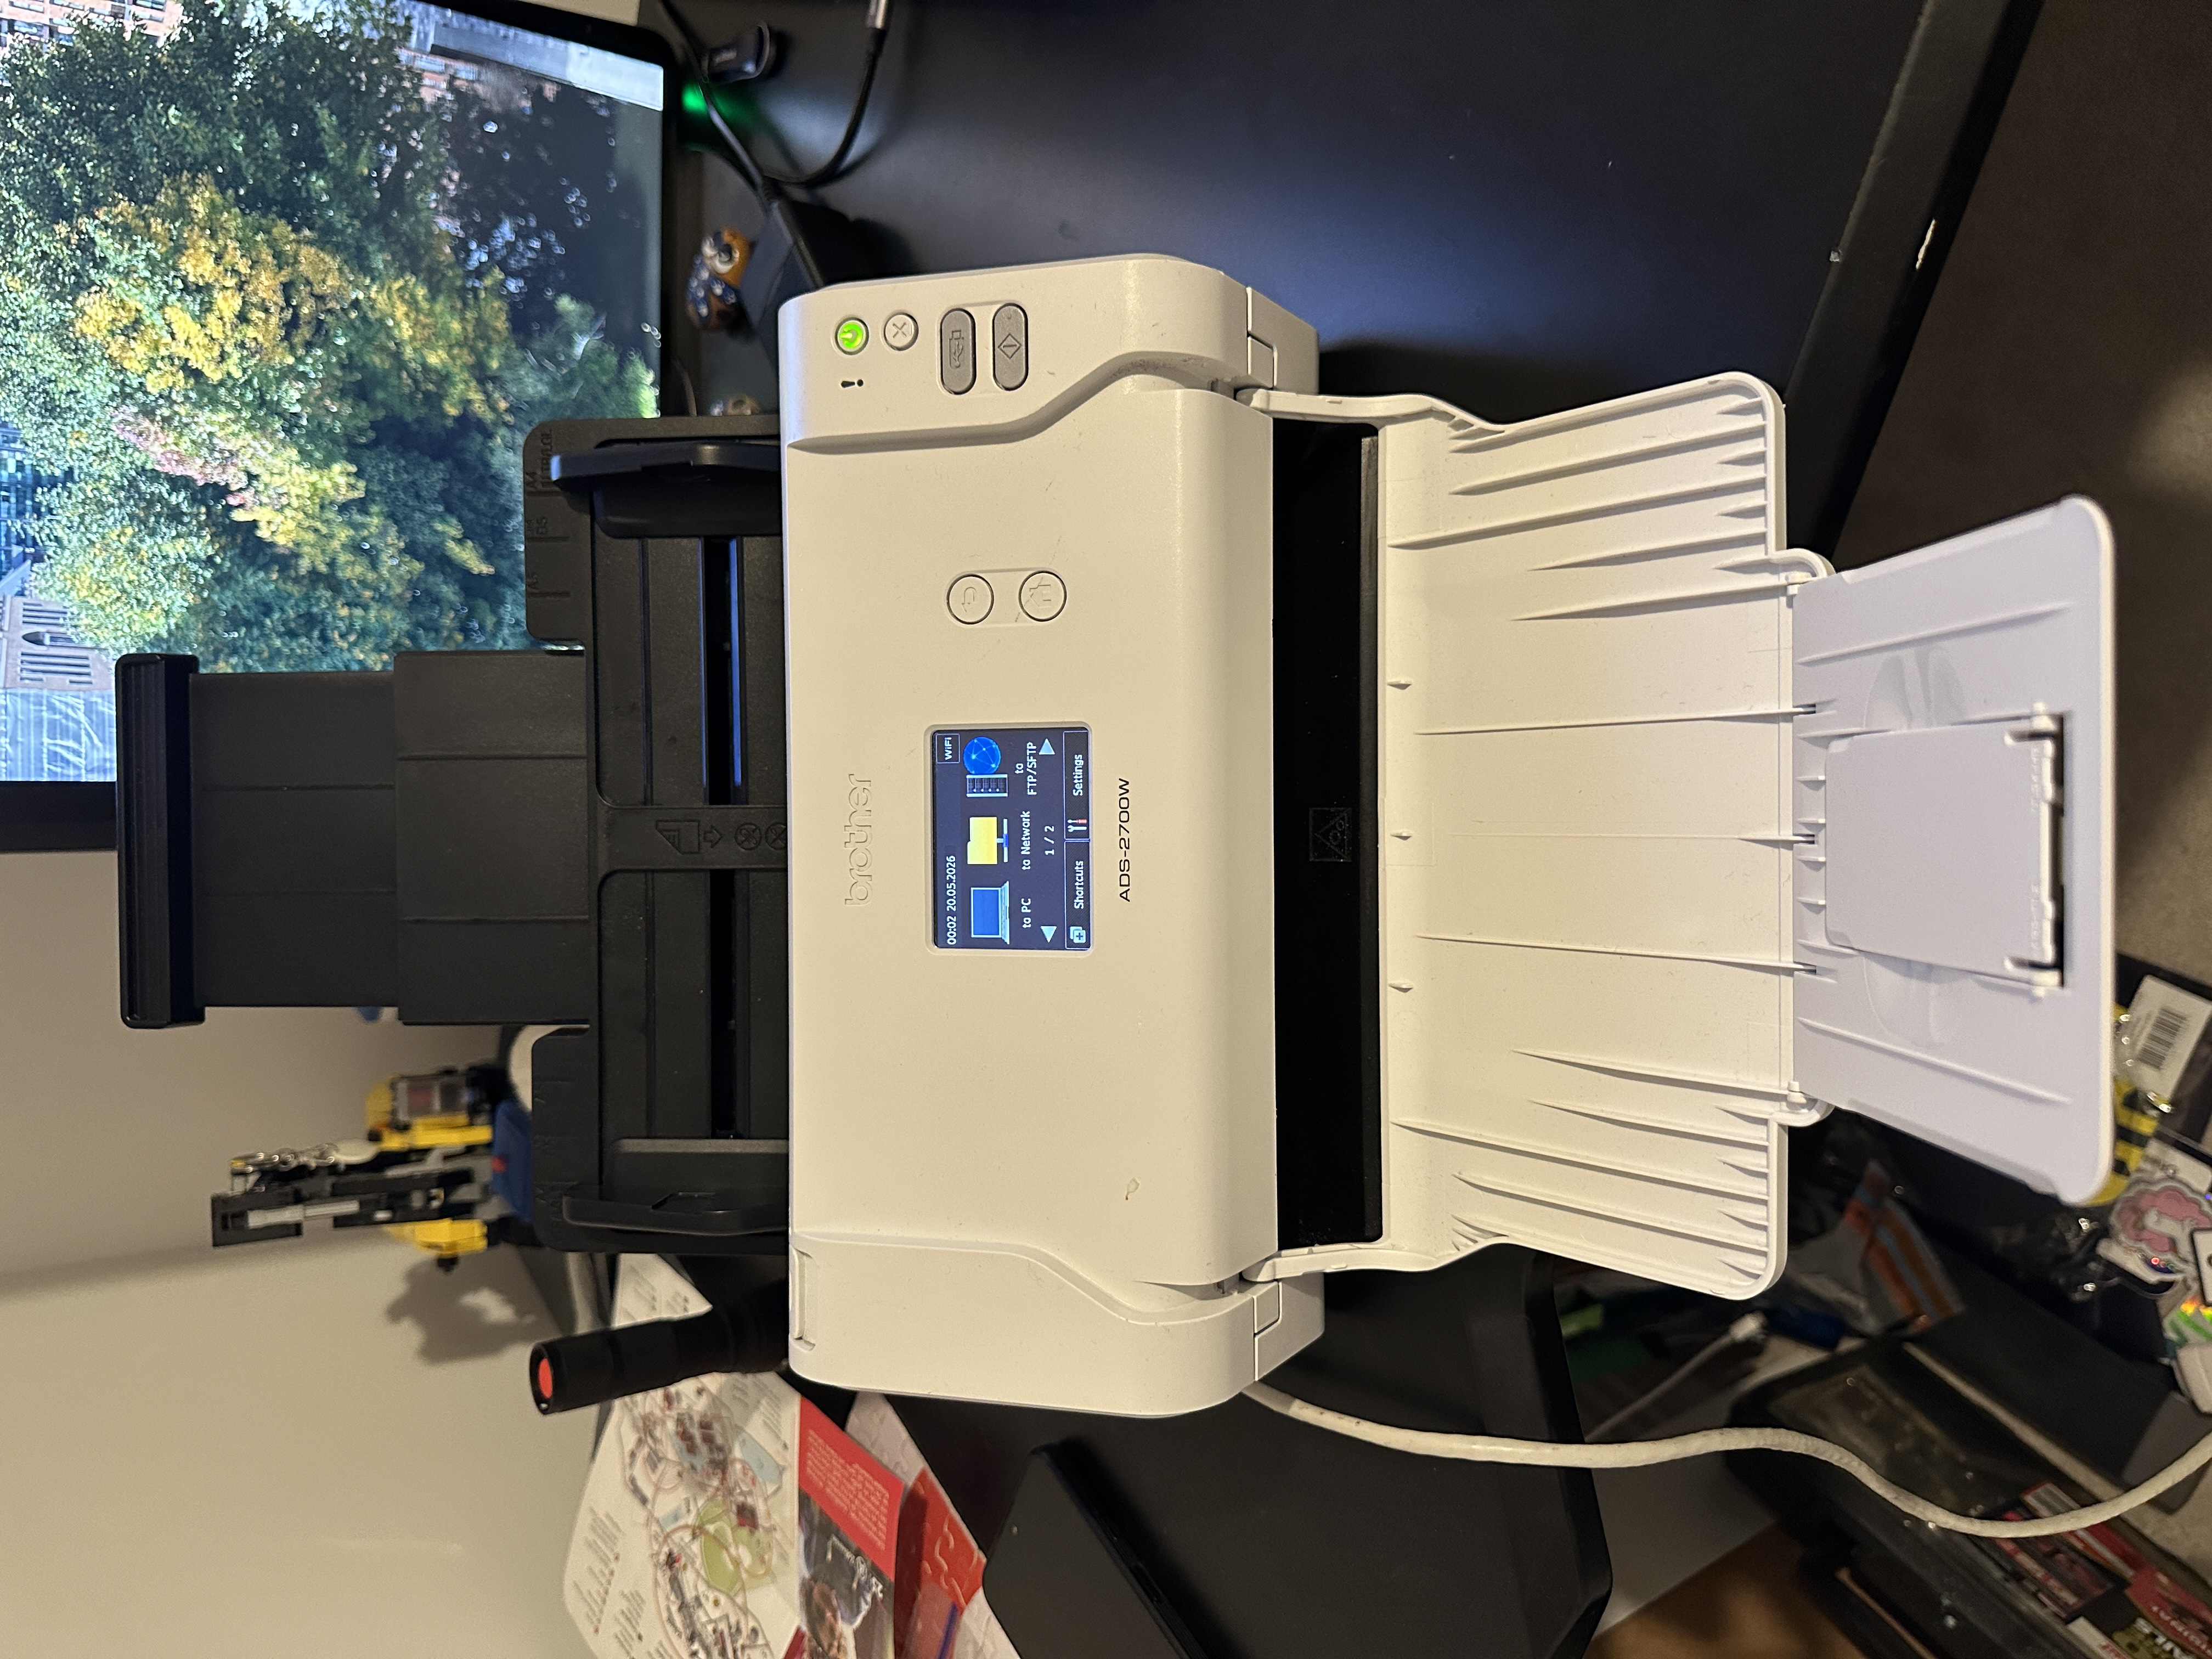
I was able to find this on EBay for £125 (€144.27) with postage, so £100 on its own.
This scanner supports ADF (Automatic Document Feed) as well as Duplex (both sides) and DPI (Dots per inch, the quality)
Setting up SFTPGo
We need to take a detour from the scanner to look at the SFTPGo setup, as without SFTPGo - there’s no use in the scanner.
SFTPGo is running inside my Kubernetes cluster, exposed to my network via BGP (Blog post coming soon…) and backed by the consume
directory of Paperless.
Below is the Diagram from SFTPGo on how this works
My Deployment and Config
First we create a PV and PVC which points to the consume directory of Paperless. This is where SFTPGo will dump files to
for our scanner user
apiVersion: v1
kind: PersistentVolume
metadata:
  name: paperless-consume
spec:
  capacity:
    storage: 1Gi
  accessModes:
    - ReadWriteMany
  nfs:
    server: <ip of your Nas>
    path: <path of share>/paperless/consume
  persistentVolumeReclaimPolicy: Retain
---
apiVersion: v1
kind: PersistentVolumeClaim
metadata:
  name: consume
spec:
  volumeName: paperless-consume
  storageClassName: ""
  accessModes:
    - ReadWriteMany
  resources:
    requests:
      storage: 1Gi
Next we need to create a config for SFTPGo. I will point out that I am using OIDC here to login as an admin, so your config will look different.
apiVersion: v1
kind: ConfigMap
metadata:
  name: sftpgo-config-file
  namespace: sftpgo
data:
  sftpgo.json: |
    {
      "common": {
        "idle_timeout": 15,
        "upload_mode": 0,
        "actions": {
          "execute_on": [],
          "execute_sync": [],
          "hook": ""
        },
        "setstat_mode": 0,
        "rename_mode": 0,
        "resume_max_size": 0,
        "temp_path": "",
        "proxy_skipped": [],
        "startup_hook": "",
        "post_connect_hook": "",
        "post_disconnect_hook": "",
        "max_total_connections": 0,
        "max_per_host_connections": 20,
        "allowlist_status": 0,
        "allow_self_connections": 0,
        "umask": "",
        "server_version": "",
        "tz": "",
        "metadata": {
          "read": 0
        },
        "event_manager": {
          "enabled_commands": []
        }
      },
      "sftpd": {
        "bindings": [
          {
            "port": 2022,
            "address": "",
            "apply_proxy_config": true
          }
        ],
        "max_auth_tries": 0,
        "host_keys": [],
        "enabled_ssh_commands": [
          "md5sum",
          "sha1sum",
          "sha256sum",
          "cd",
          "pwd",
          "scp"
        ]
      },
      "ftpd": {
        "bindings": [
          {
            "port": 21,
            "address": "",
            "apply_proxy_config": true,
            "tls_mode": 0,
            "certificate_file": "",
            "certificate_key_file": "",
            "min_tls_version": 12,
            "force_passive_ip": "CHANGE ME TO YOUR LB IP",
            "passive_ip_overrides": [],
            "passive_host": "CHANGE ME TO YOUR LB IP",
            "client_auth_type": 0,
            "tls_cipher_suites": [],
            "passive_connections_security": 0,
            "active_connections_security": 0,
            "debug": false
          }
        ],
        "banner_file": "",
        "active_transfers_port_non_20": true,
        "passive_port_range": {
          "start": 50000,
          "end": 50002
        },
        "disable_active_mode": false,
        "enable_site": false,
        "hash_support": 0,
        "combine_support": 0,
        "certificate_file": "",
        "certificate_key_file": "",
        "ca_certificates": [],
        "ca_revocation_lists": []
      },
      "httpd": {
        "bindings": [
          {
            "port": 8080,
            "address": "",
            "enable_web_admin": true,
            "enable_web_client": false,
            "enable_rest_api": true,
            "disabled_login_methods": 12,
            "enable_https": false,
            "certificate_file": "",
            "certificate_key_file": "",
            "min_tls_version": 12,
            "client_auth_type": 0,
            "tls_cipher_suites": [],
            "tls_protocols": [],
            "render_openapi": true,
            "base_url": "",
            "languages": [
              "en"
            ],
            "branding": {
              "web_admin": {
                "name": "breadNET FTP Admin",
                "short_name": "Admin",
                "favicon_path": "",
                "logo_path": "",
                "disclaimer_name": "",
                "disclaimer_path": "",
                "default_css": [],
                "extra_css": []
              },
              "web_client": {
                "name": "breadNET FTP Client",
                "short_name": "Client",
                "favicon_path": "",
                "logo_path": "",
                "disclaimer_name": "",
                "disclaimer_path": "",
                "default_css": [],
                "extra_css": []
              }
            }
          }
        ],
        "templates_path": "templates",
        "static_files_path": "static",
        "openapi_path": "openapi",
        "web_root": "",
        "certificate_file": "",
        "certificate_key_file": "",
        "ca_certificates": [],
        "ca_revocation_lists": [],
        "signing_passphrase": "",
        "signing_passphrase_file": "",
        "token_validation": 0,
        "cookie_lifetime": 20,
        "share_cookie_lifetime": 120,
        "jwt_lifetime": 20,
        "max_upload_file_size": 0,
        "cors": {
          "enabled": false,
          "allowed_origins": [],
          "allowed_methods": [],
          "allowed_headers": [],
          "exposed_headers": [],
          "allow_credentials": false,
          "max_age": 0,
          "options_passthrough": false,
          "options_success_status": 0,
          "allow_private_network": false
        },
        "setup": {
          "installation_code": "",
          "installation_code_hint": "Installation code"
        },
        "hide_support_link": false
      },
      "telemetry": {
        "bind_port": 10000,
        "bind_address": ""
      },
      "http": {
        "timeout": 20,
        "retry_wait_min": 2,
        "retry_wait_max": 30,
        "retry_max": 3,
        "ca_certificates": [],
        "certificates": [],
        "skip_tls_verify": false,
        "headers": []
      }
    }
Next, we will create a configmap to configure additional details we don’t want to put in JSON. Really this should be a secret, but it’s internal, so I don’t really care too much.
apiVersion: v1
kind: ConfigMap
metadata:
  name: sftpgo
data:
  SFTPGO_DATA_PROVIDER__DRIVER: mysql
  SFTPGO_DATA_PROVIDER__HOST: mysql
  SFTPGO_DATA_PROVIDER__NAME: sftpgo
  SFTPGO_DATA_PROVIDER__PASSWORD: sftpgo
  SFTPGO_DATA_PROVIDER__PORT: "3306"
  # Below can be omitted if you're not using OIDC
  SFTPGO_DATA_PROVIDER__USERNAME: sftpgo
  SFTPGO_HTTPD__BINDINGS__0__OIDC__CLIENT_ID: 20fb6bb2-0f3b-417a-b45e-5d40f8864087
  SFTPGO_HTTPD__BINDINGS__0__OIDC__CLIENT_SECRET: 6e386922-53c3-4c70-a622-c4bdb4c517fd
  SFTPGO_HTTPD__BINDINGS__0__OIDC__CONFIG_URL: https://your.oidc.provider
  SFTPGO_HTTPD__BINDINGS__0__OIDC__REDIRECT_BASE_URL: https://sftpgo.your.domain.tld
  SFTPGO_HTTPD__BINDINGS__0__OIDC__ROLE_FIELD: sftpgo_role
  SFTPGO_HTTPD__BINDINGS__0__OIDC__USERNAME_FIELD: preferred_username
Next you can create the Deployment, which comprises of the ports. For the scanner I chose, and because of how Kubernetes networking works, it’s using NAT so active does not work, passive ftp only. This is touched on later!
apiVersion: apps/v1
kind: Deployment
metadata:
  annotations:
    reloader.stakater.com/auto: "true"
  name: sftpgo
spec:
  replicas: 1
  revisionHistoryLimit: 10
  selector:
    matchLabels:
      app.kubernetes.io/instance: sftpgo
      app.kubernetes.io/name: sftpgo
  template:
    metadata:
      labels:
        app.kubernetes.io/instance: sftpgo
        app.kubernetes.io/name: sftpgo
    spec:
      containers:
        - args:
            - sftpgo
            - serve
          envFrom:
            - configMapRef:
                name: sftpgo
          image: ghcr.io/drakkan/sftpgo:v2.7.1-alpine
          imagePullPolicy: IfNotPresent
          livenessProbe:
            httpGet:
              path: /healthz
              port: telemetry
          name: sftpgo
          ports:
            - containerPort: 2022 # SSH FTP
              name: sftp
              protocol: TCP
            - containerPort: 21 # Normal FTP
              name: ftp
              protocol: TCP
            - containerPort: 8080 # The web UI
              name: http
              protocol: TCP
            - containerPort: 10000 # Prometheus
              name: telemetry
              protocol: TCP
              # Start of passive FTP!
            - containerPort: 50000
              name: ftp-50000
              protocol: TCP
            - containerPort: 50001
              name: ftp-50001
              protocol: TCP
            - containerPort: 50002
              name: ftp-50002
              protocol: TCP
          readinessProbe:
            httpGet:
              path: /healthz
              port: telemetry
          resources: {}
          securityContext: {}
          volumeMounts:
            # Mounts the ConfigMap config to a file.
            - mountPath: /etc/sftpgo/sftpgo.json
              name: config
              readOnly: true
              subPath: sftpgo.json
              # Mounts the Paperless consume dir to `/consume` in the container
            - mountPath: /consume
              name: consume
      hostNetwork: false
      securityContext:
        fsGroup: 1000
      serviceAccountName: sftpgo
      volumes:
        - name: consume
          persistentVolumeClaim:
            claimName: consume
        - configMap:
            name: sftpgo-config-file
          name: config
Finally, we can expose the FTP services to the network. As I mentioned earlier, I am using BGP within my network so type: LoadBalancer gets an
external IP which is routbale on my network. From there I’m using External DNS which creates a DNS record on my UniFi router.
apiVersion: v1
kind: Service
metadata:
  annotations:
    external-dns.alpha.kubernetes.io/hostname: ftp.internal.breadnet.co.uk # Creates a DNS record in UniFi
  name: sftpgo-ftp
spec:
  type: LoadBalancer
  ports:
    - appProtocol: sftp-ssh
      name: sftp
      port: 22
      protocol: TCP
      targetPort: sftp
    - appProtocol: sftp-ssh
      name: ftp
      port: 21
      protocol: TCP
      targetPort: ftp
    - appProtocol: sftp-ssh
      name: ftp-50000
      port: 50000
      protocol: TCP
      targetPort: ftp-50000
    - appProtocol: sftp-ssh
      name: ftp-50001
      port: 50001
      protocol: TCP
      targetPort: ftp-50001
    - appProtocol: sftp-ssh
      name: ftp-50002
      port: 50002
      protocol: TCP
      targetPort: ftp-50002
  selector:
    app.kubernetes.io/instance: sftpgo
    app.kubernetes.io/name: sftpgo
---
# NOTE: The below is a clusterIP which means you can't get access to it via its IP. You're expected to bring your own
# HTTP Load balancer like Envoy gateway.
apiVersion: v1
kind: Service
metadata:
  name: sftpgo-http
spec:
  type: ClusterIP
  ports:
    - appProtocol: http
      name: http
      port: 80
      protocol: TCP
      targetPort: http
  selector:
    app.kubernetes.io/instance: sftpgo
    app.kubernetes.io/name: sftpgo
Once this is all put together, we get the below:
➜ k get pods
NAME                      READY   STATUS    RESTARTS   AGE
sftpgo-6cd74d95c6-5p9dq   1/1     Running   0          36h
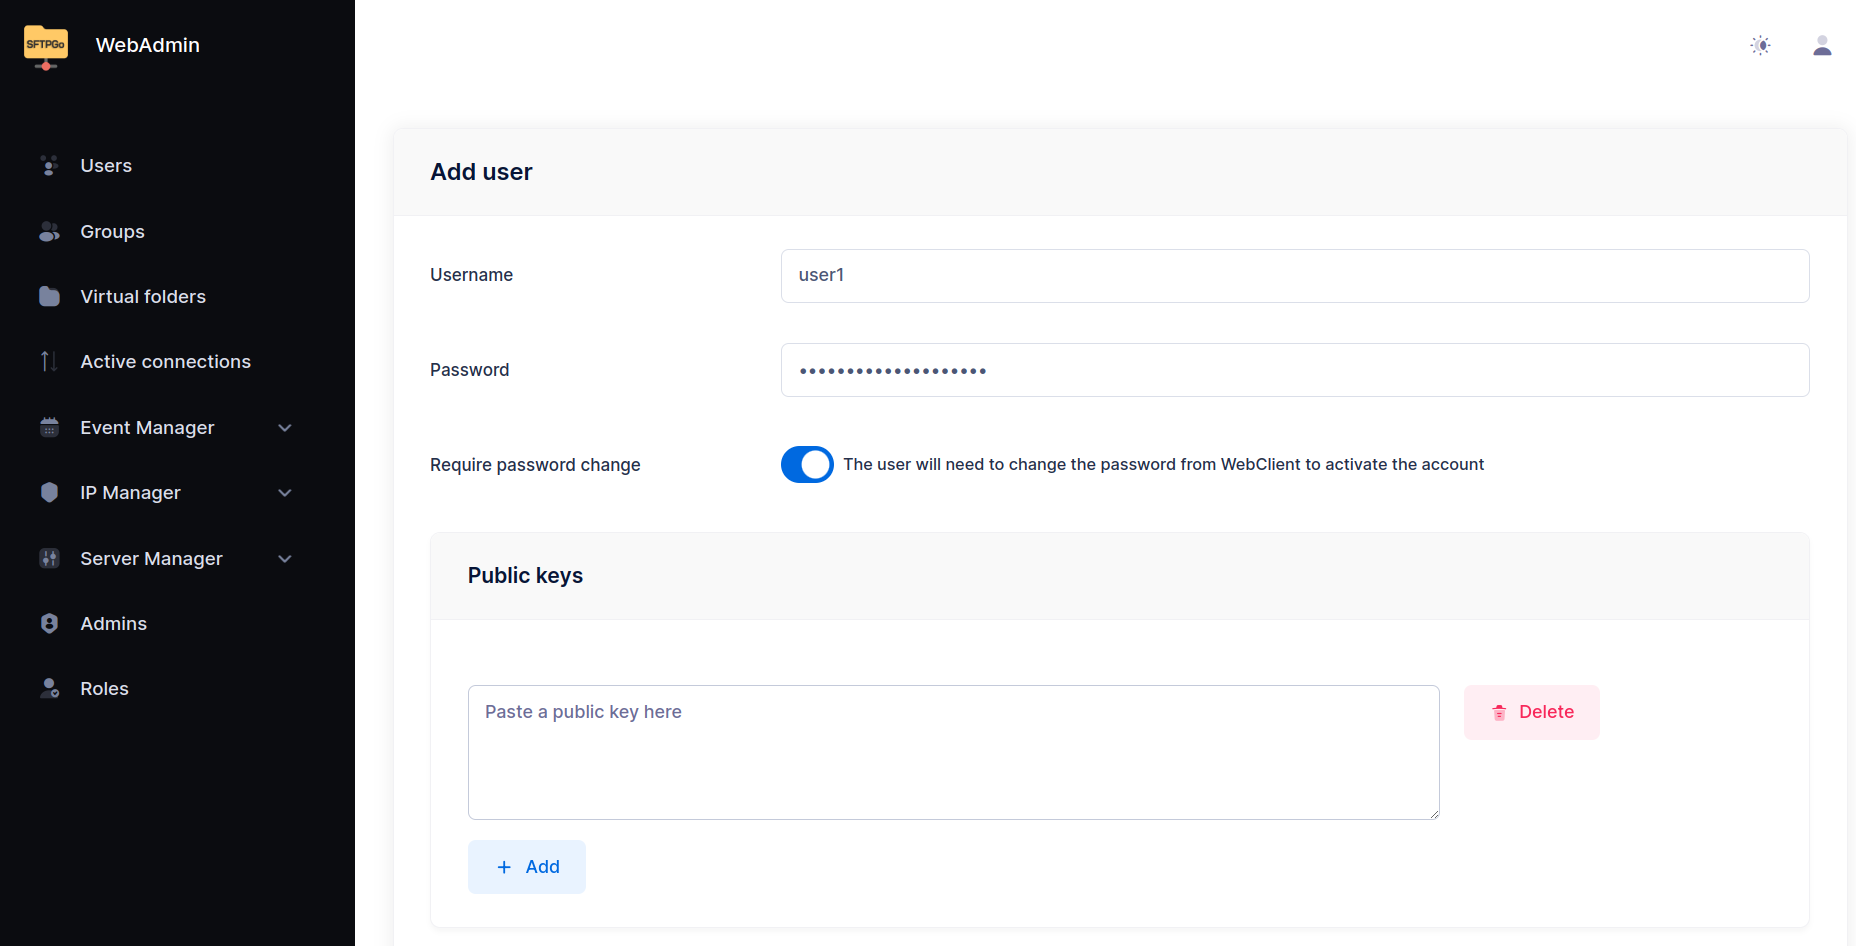
Now we need to create a user, so navigate to your SFTPgo admin, login and create a user.
I suggest you make a user using the below details
| Option | Value |
|---|---|
| Username | scanner |
| Password | scanner |
| Storage | Local disk |
| Root Directory | /consume |
Whilst the username and password are insecure, you can change these to your heart’s content.
We need to set the Root Directory to /consume which is from the PVC being mounted to /consume - by doing this
we’re not having to run scripts to copy files between pods.
Configuration of the ADS-2700W
The configuration of this Scanner was a little confusing.
Because this is an old scanner, it only supports RSA for SSH, which SFTPGo does not support. Go legacy!
For this reason, I will be using plain old FTP!
Navigate to the IP address of the scanner once it’s plugged in to your network and click on Scan

I would then suggest that you change File Name Style to Date_Counter, and set the Date to yyyy/MM/dd/HHmmss
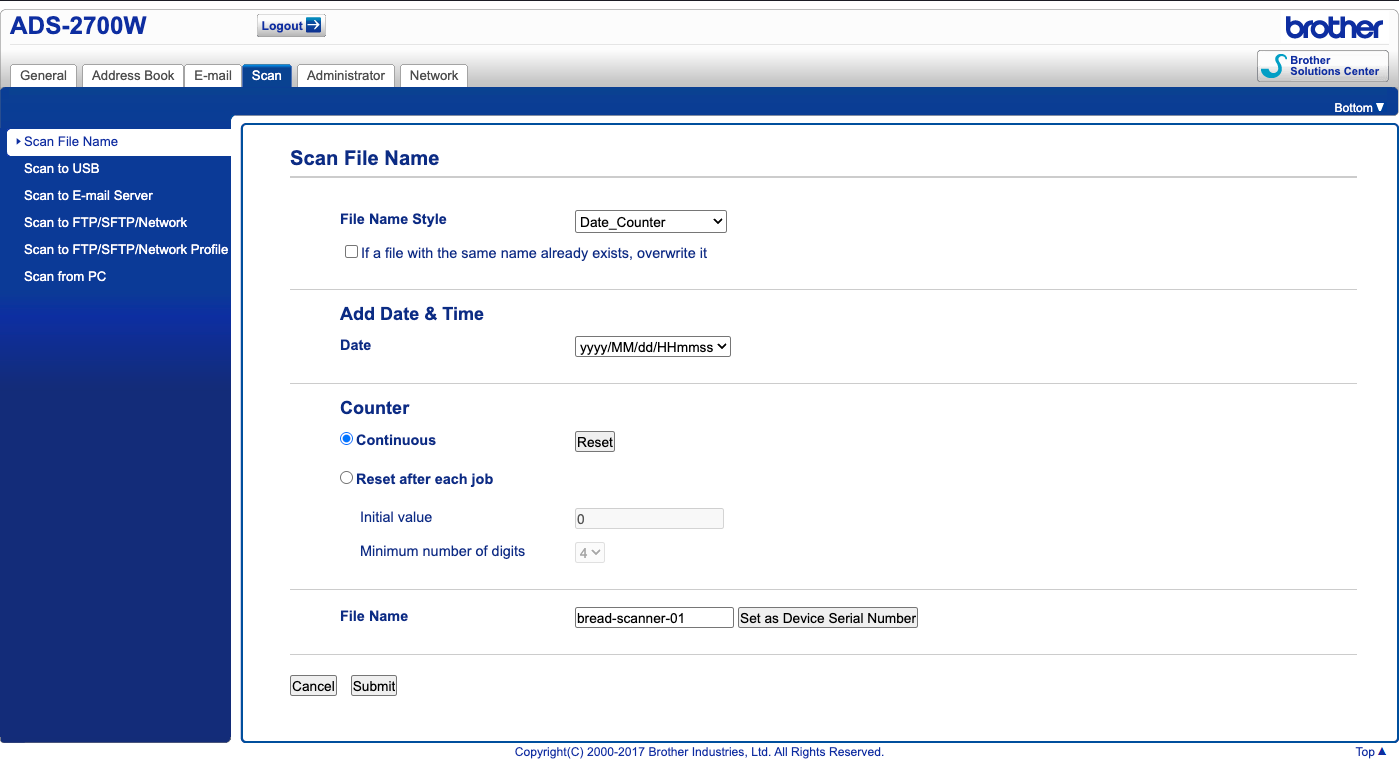
Click on Scan to FTP/SFTP/Network Profile where you will see a list of 25 profiles. Click on Profile 1
Give this profile a name, and set it as below
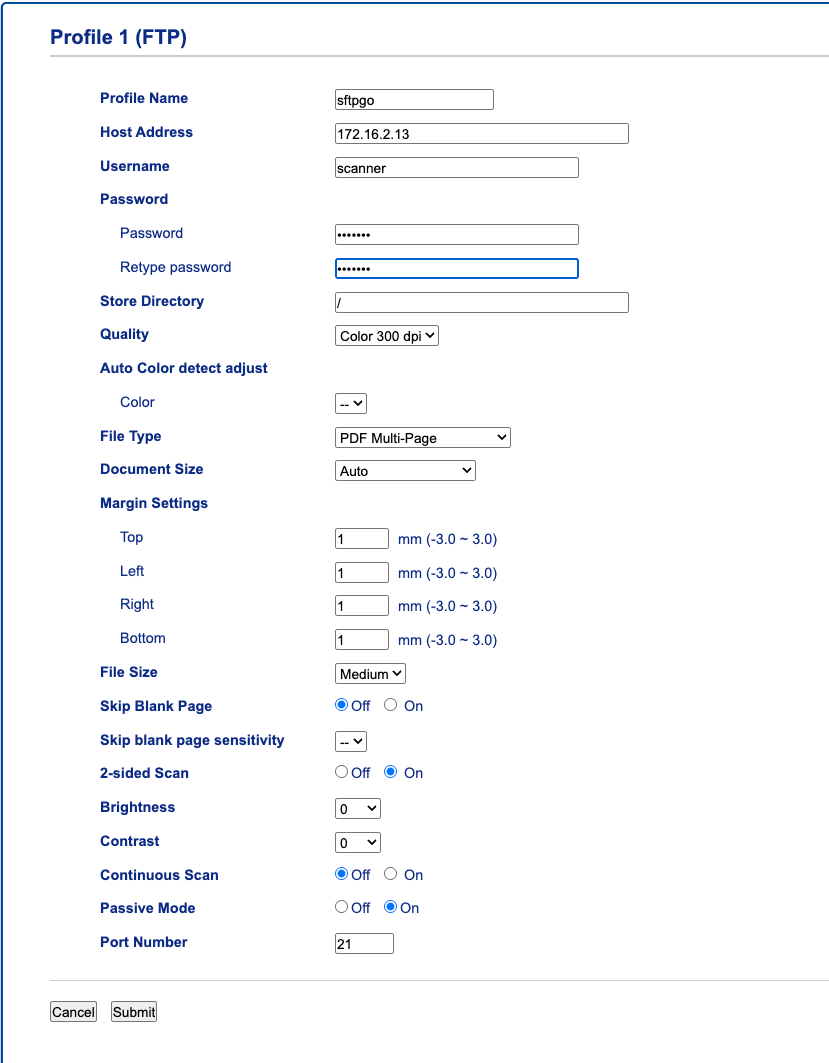
For the DPI, I would set it to Color 300 dpi - from my research setting 300 DPI is a good quality for archiving documents,
but if you’re scanning documents with lots of images, or you want very clear details, set this higher. Just note that the
higher the DPI is set, the longer it takes to scan a page.
Make sure you set Passive Mode to On - this is down to networking on Kubernetes. When an FTP connection is made, it flows like
scanner -> Load balancer -> Cluster network -> Cluster service -> Pod
This means that it just breaks. Truth be told. If you want to read up more on this, I recommend This page
Once you’ve made the changes, click Submit and then test. Hopefully you get no errors!
Now your scanner is set up and ready to scan to SFTPGo!
What about Paperless?
It’s hard to show you my Paperless without doxxing my self, as you would expect all post has my address on.
Closing notes
I hope this document has been helpful in some capacity. If you are struggling with anything, please reach out to me! You can find my contact details at the top of the page!
Since getting this setup, I’ve been able to scan all my post in around 8 hours. It was a long 8 hours, but I got in to a flow with a podcast on.
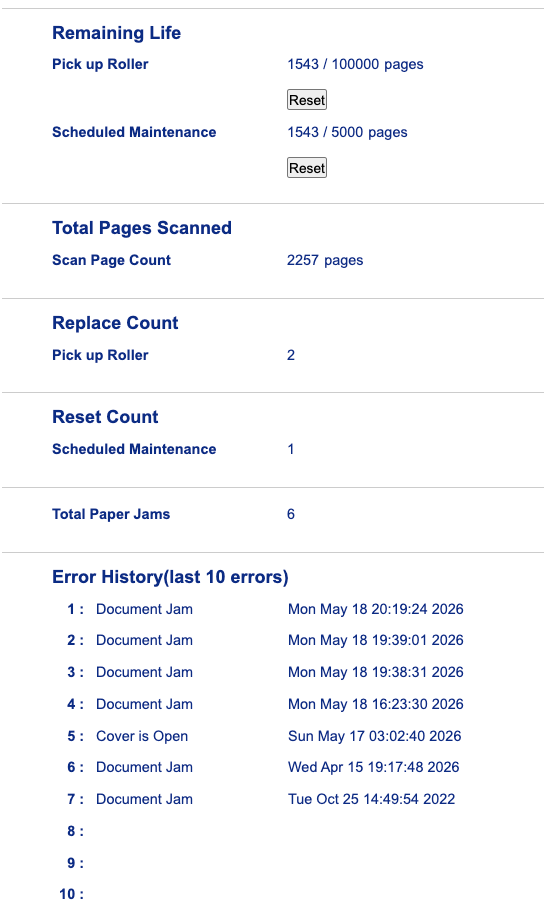
Below is a screenshot since I reset the scanner for this blog post. So it has scanned considerably more!